


 We transport our canoes and surf skis practically as much as we paddle them. Sometimes we are so lazy after a good long paddle that we even leave the canoe on the roof (guilty). So wouldn’t it be important that the rack we use to carry the craft is safe to travel with, easy to load, and oh yea, affordable would be nice too right?
Well, for the past few months we have been seeing more and more racks by a company called Goodboy Paddlesports (formerly Good Boy Kayaks). And with several long trips coming up, we decided there was no better time to test one out and share our feedback with you all than now. So please enjoy the review below, where we take you through the unboxing, installation, and use. Mixed in with some good old fashion customer service.
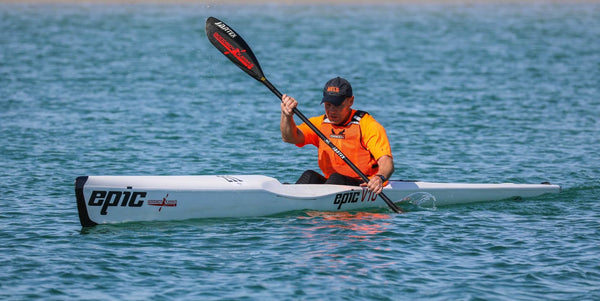
First thing is first, we reached out to the owner of Goodboy Paddlesports, "Cliff". After emailing with some questions, we soon got a thoughtful reply. That was followed up taking our phone call as we wanted to get the story on his company. Together we decided what product would be best for our situation. I can’t stress enough how great it is to have a person who makes the products be willing to talk about them. We talked about the story of the racks and company. And low and behold, we talked paddling too, as Cliff paddles. Compare this to big corporate companies who don’t always know the difference between paddling and rowing but are sure willing to sell you their product with all the slick marketing, but lack the answers a paddler wants to know. Like, “Will this work best if my canoe is upright or upside down?” “What do I do with my ama?” “Where should I line up my craft on my car?” And “how do I load without scratching my surf-ski?” Each of these questions is valid. And it is great to have a paddler willing to answer them based on his or her experience. (That's him paddling the Carolina Cup on his Epic v10 surf-ski in orange).
After we discussed the kind of racks I currently had, my car type, and the craft(s) I would be carrying, we came up with the perfect solution from his offerings. In addition, Cliff was quick to point out that they will customize for any situation if you need something. For instance if you have a really long OC2? They can make an extra long bar. In my case, I would get the Hatchback special. A 6’ bar, with two appending and remove-able ends with v-bars that each add another 1’ of span. For a total of 8’.
When the box came a few days later, we cracked it open to see what we had.
The contents...
[Note about above video: Shipping was incorrectly quoted in video. It is actually $40.00 to ship, including to Hawaii and Canada.]
Rack Assembly and Installation
After the unboxing, it was time to install. Mind you, I am not the most mechanical of paddlers. But have installed a few systems in the past, and was curious how long the process would take, and how complicated it would be. In reality it was pretty simple. And the included directions were minimal but Cali Paddler proof, with diagrams and clear steps.
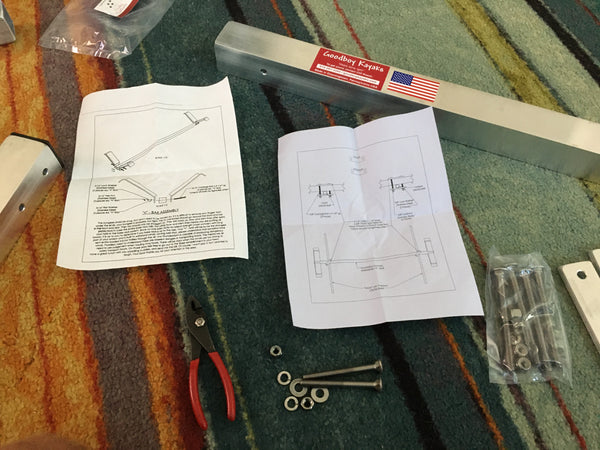
Tools needed
A set of pliers was used at first. Later I grabbed a socket wrench, but it was only for speed. A wrench, pliers or socket would each do the trick.
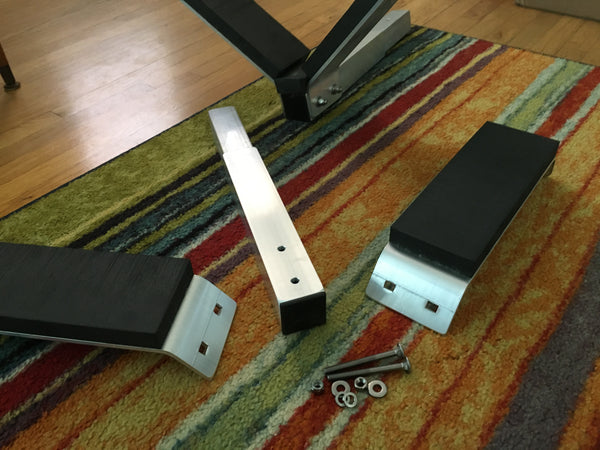
Step 1. End-Piece V-Bar Assembly
Assemble the diagonal cradles )Vs to the end piece units. This created the Vs. Two bolts, 4 washers on each. Did not need a second set of hands. Roughly 5 minutes for both.
Step 2. Main Bar to Car Install
This step was attaching the longitudinal main bar to the car. This required a little time to ponder if I wanted the bar to be on driver side, passenger side, or centered. In my case, I wanted the ability to have two canoes side by side, so did not center it. Originally it was passenger side centered but eventually unscrewed and moved it and placed as far to the passenger side as I could for access and reach. I needed to use plates underneath that were bolted to plates above the bar. At a diagonal (front left to bottom right) to the vehicle's cross bars.
Being sure to screw the bolts evenly to create even pressure, this process ran into a little hiccup for me. The bolts were barely too long and making contact with the car. My rack is a Toyota Factory rack, and unlike Thule which are square, these are not as tall and not as high off the roof. So initially the 5 ½” bolts when tightened made contact with the roof of my car. My car is old, and I was not too concerned about the appearance factor of marks, but this was not ideal because if they scratched the paint it could expose metal and cause rust. Especially living near the beach. I sent Cliff an email, despite knowing he was going on vacation and might not get back to me right away. Well, he got back to me within an hour. (Shortly after the video below was recorded). He said the short term solution would be to flip the bolts so they are pointed up. But acknowledged that a craft might contact them in some situations. He suggested I try that and see if it cleared ok. But in the meantime, regardless of that outcome, he would mail out to me right away shorter bolts. Just like that customer... service to the rescue! In the meantime, I flipped the bolts and was satisfied how the canoe had clearance and did not contact them while in the cradles. This process would have taken probably 10-15 minutes if I had not had to step back and redo them. But even with my doubling of the work, by grabbing a socket wrench, it only took 20 minutes and the bar was installed.
Step 3. End-Piece V Installation
This was the fun step. I took the now built end-piece v extenders I built in Step 1 and slid them into place onto each end of the bar. There is a little linchpin and clamp that locks each in through aligned holes and viola! We had our rack system. Time to complete: 1 minute.
Loading the canoes.
Here is where I really enjoyed the process. Loading the on various vehicles and racks can be a real pain. Ratchet straps, foam pads, I have dealt with it all, and each time I wished for a simpler solution. The Goodboy V-Bar Rack System is it! I swear to you on my paddle, I was loaded and strapped in (with two bungees on each End-Piece V for extra piece of mind) in less than 60 seconds. It took so little time I started to question that it "must not be safe...right?". But as I walked around the car and tried to shake or jostle the canoe, front and back, I was convincingly assured that it was safely loaded in the padded v-bars with no dangerous wriggle room. One beauty of the v is that the canoe can sit right side up or upside down bad on how the craft best sits...but for mine, it was solid either way. The oc1, v1, surf-ski or whatever nestles in and then the provided bungees (which I can loosen or tighten) just hook onto the top of each v 'lip'. The bungees did not seem to be putting dangerous stress on the canoe (which trust me - I baby more than my car). And distributed the pressure evenly. Unlike ratchet straps, or tension straps which I can sometimes go too tight on, these felt snug without too snug. Hard to describe. But I liked it. Please see my section below about "Redundancy" however, as there are more straps included with the system and how they are designed to be used in addition to the bungees.

Driving.
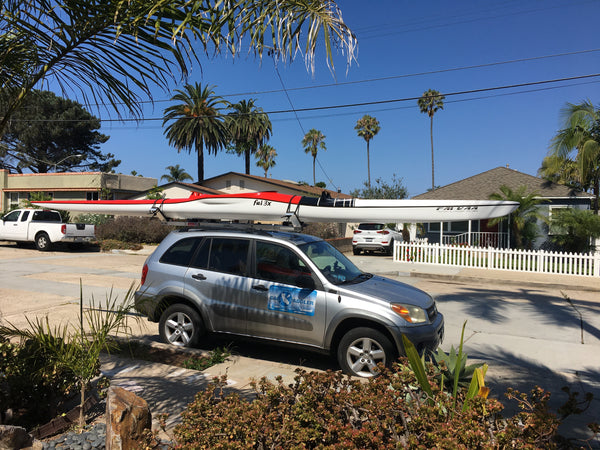
My first test was around the neighborhood. The canoe didn’t budget. Unlike some other big name racks I have used, this did not bow or flex. The canoe and the rack stayed in line with the vehicle. I drove over speed bumps and the canoe was locked with me. I drove down a street with dips. Same positive result. For good measure I drove on some dirt parking lot area with lots of bumps and gravel…canoe and rack = solid.
Next up, the freeway test. Anyone can drive on city streets and feel comfortable. But it only takes one friend who lost canoes or skis on the freeway to get a pit in your stomach each time you look up at 65 mph and see your canoe shift. It is a horrible feeling of panic and dread. So you can be sure that when I took this next route, I would be very interested in the results. And I must say, it was the same! Pure comfort and bliss. No shaking, not sliding. The rack and canoe were solid! I decided to push the speed up to 80mph for a quick stretch, no problems at all. This rack had me sold.
Disclaimer: Now, granted there was no cross winds at that time. I was not near a semi truck driving along Interstate 10 coming home from ADR, or up along Interstate 5 in the grapevine on the way to paddle Lake Tahoe. And Goodboy Paddlesports makes a point to encourage good judgement in weather and wind. I don’t imagine any rack is able to withstand a tornado. So please be sure to reduce your speeds if the winds get gnarly. And if they are really making things sketchy, pull over.
Additional rack notes and tips
Redundancy
Personally, I am a big fan of eliminating single points of failure. What if the factory crossbar fails that is holding my Goodboy rack? Anything can happen right? So on my first long road test, from San Diego to Newport (1.5 hours each way at freeway speed), I decided to not only do double bungees on each cradle. But also added a strap around the factory racks too. Just in case the cross bar(s) or v-bar system had a problem. I figured for a drive that far, why not spend an extra 5 minutes adding some fail-safes. The rack system also came with multiple cam-straps as a backup to the bungee setup. So I checked in with our friendly rack expert once again for his official recommendation. Per Cliff, "The boat is held in the cradles with the bungees, and the included red straps go around the boat and bar as a back up. They are just snugged, and not cranked. One goes around the front of the foot well, and the other in front of the rear V. These are important for people going to the Gorge where winds commonly hit 40mph, or anywhere the wind starts rocking." I will be following this guidance on an upcoming 8 hour trip to San Francisco. But for my normal 15 minute drive to my home waters, I feel extremely comfortable with just the supplied bungees.
When not in use…
One thing I really like is the ability to take the v-bars off when not needing them. Each one is light, (5lbs 10oz.) and the process to remove is 2 minutes max. The system came with little rubber end caps to place on each end of the bar so it doesn’t whistle when driving empty and creating a wind tunnel. The End-Piece Vs can then be stored at home, in the trunk or wherever. Of if you want, just leave them attached. Your call, but since they tend to rattle a slight bit when empty, and can only hamper gas mileage, taking advantage of them being removable is my preferred route.
Costs
Looking at all the products on the website, the racks systems range from $240-285. Plus there are a few accessories to get as well if you want an ama carrier, wall mount shelf, locking straps, and replacement hardware. The pricing does not include shipping which is $40.00 (including to Hawaii and Canada).
Final thoughts...
I have carried outrigger canoes, surf-skis, paddelboards and surfboards all across this giant state. Often times tempting fate as I try to sneak more onto my roof than a clown car. But with the Goodboy V-Bar Rack System, I have really found a solution that gives me piece of mind when I travel now. The fact I can buy an extra long bar for my other vehicle and have it ready for the v-bars too helps me as well so each vehicle is '1 minute from ready'. The ease of installation, and especially loading was very welcomed. Finally, the fact that the company and products are built by a paddler, for us paddlers, who is willing to stand by them after testing improving and refining on himself for years, gives me every reason to recommend these racks.
Shop now and find yours at goodboypaddlesports.com.
Pros
- Low profile main bar with remove-able End-Piece Vs for when not in use. Good for gas mileage, parking garages and aesthetics.
- Loading and strapping down craft is extremely easy.
- Very stable at all encountered speeds and conditions.
- Extended span ensures our long paddle-craft are well supported, even when our roof is very short.
- Quality parts and materials; made in USA.
- Amazing customer service.
Cons
- Screws too long initially for my setup, (but was given a quick and effective solution and replacements were sent too).
- The extender linch-pins have a small clamp to keep the wire hooks aligned together. I am not sure this is stainless steel as are all of the other parts. Really nitpicking here.
- Slight rattling sound of the v-bars when empty as the linchpins jostle a bit on bumps. Was barely noticeable at first and now I don't hear it.
Be sure to check out our other CP Reviews.
Team Writer Clarke Graves - If there is water, he will paddle it (regardless of craft). Clarke is a surfer turned paddler who grew up in San Diego but has traveled every corner of California enjoying its beauty and appeal. He has had the privilege of racing SUP, OC6, OC2, OC1, Prone, Dragon-boat and surf-ski.
One of Clarke's goals is to paddle as much shoreline in California as he can, with as many paddling friends who are willing to join him. If you have an idea for Clarke to write about or any questions, send it our way and we will pass it along!


James Lake - October 19, 2025
Was talking to Jon Morgan. About his kayak roof rack. I love it. I have f150. With rhino bars. I have Epic v9 and a racing wooden kayak ( same length). I would like to purchase one.
Leo Burns - October 01, 2024
A great review… I called Cliff and he answered while he was on holidays and got everything set up and shipped… customer service is 12 out of 10!
My racks arrive in two days… Question, do I need a stern line or is the rack solid without? 😳🙏
Leo Burns - October 19, 2025
A great review… I called Cliff and he answered while he was on holidays and got everything set up and shipped… customer service is 12 out of 10!
My racks arrive in two days… Question, do I need a stern line or is the rack solid without? 😳🙏
joseph Pettigrew - November 29, 2022
G’Day All,
I have a 2018 4 door jeep jl wrangler with a full rhino rack bolted to the jeep hard roof, i will bolt your bar to.
Ski is a 17ft nelo 520 also the oldest surfski paddler at 91, what be the cost for the set up ? + shipping to venice Fl.
Cheers Joseph
David - September 22, 2022
Hi
Looking to buy a rack for a V7 surf ski.
Thx